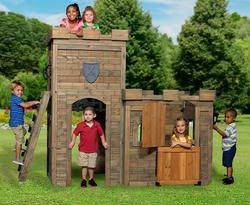
Paul's Playhouse Guides, Tips & Blog

Backyard Play-set Construction Vehicle Plans
 I distinctly remember when I was little, my parents had a little plot of the backyard devoted to me and my Tonka construction vehicle toys. I used to spend hours digging, plowing, excavating and moving dirt back and forth between the front load, to the backhoe and into the mining-grade dump truck. I later realized this maneuver was done by my parents to keep me from totally uprooting the entire yard, but in that one space, my trucks and I were king.
 With these three backyard, construction vehicle plans, those little toys get blown up to life sized proportions! Why settle for a standard swing set you can purchase from a big box store when, with a little woodworking magic, you'll have not only something totally different than the rest, but make a child's dream a tangible reality.
The dump truck, bulldozer and steamroller plans all have neat little details that really make a pop when you seem them. Exhaust stacks, lights, ladders and wheels you can crawl though all make up the groundwork of engaging play. All part of the total vehicle collection here at Paul's Playhouses, having fun is what we're about!
Construction Dump Truck Play-set Plan
 Similar to the monster truck, this design was inspired by the huge, ultra class haul trucks used by mining operators to carry up to 400 tons of ore in one go. Many of them had several ladders bolted right to the front grill, and tires that stood 13 feet tall. Needless to say, these are pretty serious construction vehicles, and it now can be right in your backyard!
Despite now being 13', the tires on this play-set still reaches a honorable mention of 6'. 250 square feet of play space is stretched over 2 levels of the cab, dump bed and 1st level bowels. Up front is the driver's cab with their own seat and a wrap around balcony. Exit the back door to enter into the dump bed and proceed to the rear slide or down the trap door to the 1st floor. There are six ways to enter and exit the dump truck, including three ladders and the back slide.
No detail has been overlooked too! Not only are there four huge wheels, but the top of the play-set has a light bar and the dump bed has the pattern of similar trucks in it's class. All together, the Construction Dump Truck Play-set Plan stands head and shoulders over the rest and makes for one rocking and plowing project for the ages!
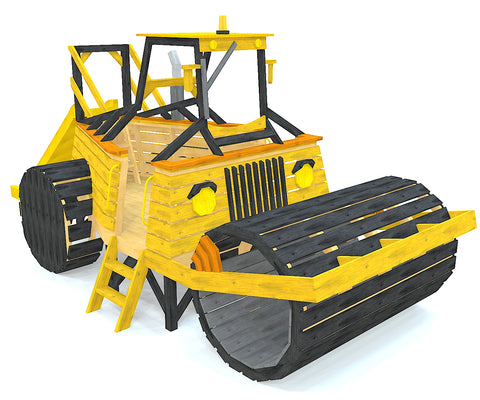
Big & Burly Bulldozer Play-set Plan

The first thing most people see with the Big & Burly is the enormous front blade, ready to push dirt, rocks or anything else that dares get in it's way. Ready to back that up are a set of 16' treads that can be accessed and crawled though on the 1st floor. Making your way up the interior ladder and through the trap door, you'll enter the driver's compartment where you'll get a good look at all the destruction committed. Other cool details include a top light bar, transparent front grill and exhaust stack. Truly not a backyard play-set for the faint at heart.
Road Roller Play-set Plan
A little smaller and similar than the previous two designs, the Strapping Steamroller still has it's rightful place in captivating residential playground equipment. Just like the bulldozer, both of the rollers can be crawled though, and two step ladders on either side lead to the central cab with enough room for two steering wheels, helping to avoid potential sibling quarrels.
This play-set isn't without little details as well. Duel exhaust stacks, top light bar, front grill and headlights make up the neat ascetics for added realism. 60 square feet make up the total play area. Download the plans and start building today!
Bonus: Track Loader Swing set
 I couldn't end this article without mentioning AllWebDiscounts.com's Track Loader Swing set. If building your own construction vehicle doesn't quite seem too feasible to you, but you still wanted something cool, I highly recommend you look into this unique swing set. Pictures of this design are all over Pinterest and Google for very good reason. The attention to detail is amazing, and I absolutely love the overhanging bucket and tread work!
Don't forget to also check out our handpicked Top 10 Boys Play-set Plans for other cool designs you can download!

The Complete Guide to Outdoor Playhouse Kits
Why Buy a Playhouse Kit?
Playhouse kits usually offer more particulars and choices than a scratch project can reasonably afford. Almost all of the below kits are produced in a warehouse or assembly line where tight tolerances are kept, giving the structures a quality and state of precision most people wouldn't be able to achieve. Despite children's playhouse kits being a bit of a niche, there's no denying luxury and economical market for artisan child's clubhouses. Don't forget to add some cool accessories to your new outdoor abode too!
Preemptive Questions
Before beginning the order process of any one of the units listed, it's important to keep a few questions in mind so that you'll know what you're getting yourself into. Some are more obvious and other's less so, but all should be considered before buying.
- What will the shipping cost and delivery time be?
- Will I need some help in removing the kit off the delivery truck?
- What is the return policy like? Is there a restocking fee?
- Are there any hidden fees?
- What tools and additional materials will I actually need to complete the project?
- Do I honestly have enough room in my yard for this sized playhouse?
- What are the township codes and regulations like?
- How will the neighbor's react?
- Does my home insurance need to be informed of the new structure?
- How watertight is the building?
- How many man hours will it take to complete the playhouse assembly?
- Am I getting the best playhouse for the age and number of my children?
- How do other people speak about or rate this kit?
- Should I consider using a professional to help me in the assembly?
As can be expected, playhouse kits can vary wildly in terms of size, target age group, difficulty in assembly and especially price. Many of the structures below come with a great number of add-ons and options that can more than double the total cost. Categorizing by brand, we'll cover all these vacillating situations so that you can make the best decision for you.

Helpful Tips
The best bit of advice, whether you're buying a kit or a plan, is to think through the entire process and consider the issues that may crop up. Unless you opt for a fully constructed design, there will be some assembly required. Depending on which of the many models chosen, some will require more work than others to complete. Before you give them your credit card info, make sure to have these principles in mind.
- If the playhouse is made of wood, check to see if it's been treated in anyway. Cedar and pressure treated lumber doesn't necessarily need to coated, but it will weather and turn a silver color after a year or so. Applying a stain or outdoor grade paint will increase the lifetime of the structure by many years. Some stains may need to be applied every few years.
- If you would still like to try your hand at building something for the kiddos in addition to the kit, the free swing set plans make for an excellent choice for an additional accessory!
-
If you don't have any flat grade on your property, you may need to build an island deck for the playhouse to rest on. This will require digging holes, pouring concrete or using blocks and framing joists, much like an attached house deck.
-
When choosing the size of the playhouse, make sure not to get something the kids will outgrow quickly, but also not something so large that it'll loose the child scale intimacy they'll need to desire playing in it. Placing stakes and string on the ground to simulate the walls is a great way to see if your children like the size they'll be receiving.
-
If you're looking to maximize the use of your child's new 2nd home, also consider hiring a electrician to wire up power. This opens up the option for keeping the lights on when the sun goes down and powering a space heater in the colder winter months. Maybe even providing a spot to charge their ipad if they've been good.
-
Just because you're buying a kit doesn't mean that the kids can't help adding their own creativity too it. Usually the interiors have not been painted, resulting in loads of free space for them to help color and decorate. All the empty interior space will need to be filled too. There are many on-line and brink & mortar stores that offer child sized furniture I'm sure they'll love to help pick out.
-
The area around the playhouse shouldn't be ignored. The immediate landscaping around the structure can add a lot of personality to an otherwise plain edifice. A flag stone path, white picket fence and well placed plants and foliage go a long way.
Luxury Playhouse Kits (Over $5000)
*Note that many of the brands listed below offer more kits than what is shown, but for space reasons we can't show them all.
Lilliput Play Homes
 Grand Victorian
When you purchase a playhouse from Lilliput, you know you're getting the best. This beautiful mini-mansion is the pinnacle of picturesque youth living, and the Grand Victorian spares no details, inside and out. Features exquisite trim work throughout, skylight, strained glass windows and a working door bell.
- 150 ft² in interior play space
- 17' Wide, 9' Deep, 9' 4" High
- 13 windows
- For ages 3-7
 Sassafras Castle
Short of hiring a professional to build you a custom citadel, the Sassafras Castle is the cream of the crop when it comes to children's play castles. You know that when you're buying from Lilliput, the details don't come short. Containing several secret areas, rock wall, superb front entrance door. Plus a fireplace mantel. So cool.
- 60 ft² in interior play space
- 8' Wide, 6' Deep, 8' High
- 3 windows
- For ages 3-7
 Victorian Mansion
If you were to take a shrink ray and a time machine back to a residential Victorian neighborhood, you very well may end up with Lilliput's Victorian Manson. The front tower and mansard roof really make the playhouse look like it's right from the 1880s. Plenty of sunlight is allowed to come though with the many windows and front door.
- 48 ft² in interior play space
- 8' Wide, 6' Deep, 8' High
- 7 windows
- For ages 3-7
 Cotton Candy Manor
Modern suburban living shouldn't be left just for the adults, now the kids can get in the action to. The delightfully named Cotton Candy Manor has everything a tasteful kid could want. 2nd level balcony, roof dormers and front door knocker and just some of the wonderful details you'll partake of when you choose this abode. And yes, it does have a working doorbell too!
- 80 ft² in interior play space
- 15' Wide, 6' Deep, 120' High
- 7 windows
- For ages 3-7
Daniels Wood Land
 The Original
As far as I'm concerned, anything the brothers at Daniels Wood Land touch is gold. They've created props for movies, built commercial playgrounds and shoot galleries, have their own show, and it all stared with the Original. Using a real log for the base and topped with a wonderfully whimsical treehouse, you can't get more story book than this awesome clubhouse.
- 20 ft² in interior play space
- 8.5' Wide, 7' Deep, 15' High
- 6 windows
- For ages 3-7
 Monkey Mansion
A much more involved version of the Original, the Monkey Mansion has all kinds of ways for kids to run, jump and swing around to nearly no end. Monkey bars, climbing net, climbing wall, fireman's pole,swing and slide are just some of the ways your child can interact with this crazy creation. You can even opt for a deluxe upgrade and bumps up the size of the clubhouse and log size.
- 20 ft² in interior play space, 280 ft² in total exterior space
- 27' Wide, 10.5' Deep, 15' High
- 6 windows
- For ages 3-7
 Scallywag Sloop
My personal favorite of the DWL treehouse kits, the Scallyway Sloop has been littering the internet with it's envious photos for some time now, and for good reason, this thing is just cool. Practically Disney grade quality, this ship clubhouse kit is the ultimate backyard accessory for the sea minded child. Great attention to detail would be an understatement. If I had to pick my favorite part, it would have to be the skeleton figurehead. Also if you have more kids than you know what to do with, consider opting for the deluxe version!
- 30 ft² in interior play space, 280 ft² in total exterior space
- 19' Wide, 9.5' Deep, 23' High
- Jolly roger, crows nest, main mast, swing and fireman's pole
- For ages 3-8
Little Cottage Company
 Grand Portico Mansion
At first glance, this looks like a typical suburban mansion, until you realize it's for those shorter than 4 feet tall and not so up in th years. Complete with a 2 story look and plenty of windows to spare. Built by the Pennsylvania Amish, this delightful artisan playhouse kit will charm and rapture your little ones for years.
- 160 ft² in interior play space
- 16' Wide, 10' Deep, 8' High
- For ages 3-6
- 2,950 Lbs
 Sara Victorian Mansion
Basically a smaller version of Lilliput's Grand Victorian, the Sara Victorian Mansion has a lot of fun and magic to offer. Lavish details like a hip roof, front torrent with loads of windows and front door overhang really add a lot to the overall whimsical aura. This playhouse kit will make for a great gift to that special little one.
- 160 ft² in interior play space
- 16' Wide, 10' Deep, 10' High
- For ages 3-6
- 2,400 Lbs
Standard Playhouse Kits ($500-$5000)
Little Cottage Company
 The Victorian
Whenever you buy a playhouse kit from the Little Cottage Company, you know that you're buying into quality. The Victorian features a delightful hip roof design with front porch, chimney and pink wavy trim. The perfect spot to have a lovely tea party with all your closest stuffed animals friends.
- 96 ft² in interior play space
- 8' Wide, 12' Deep, 8' High
- For ages 3-6
- 1, 079 Lbs
 The Gingerbread
I love this one and it offers a lot of interior play space for the buck. Comes in three different sizes and many different colors so you can get what is best for you. Ornate trim, chimney and a heart shaped window add a lot of character too. A fine outdoor kit for that little girl in your life!
- 96 ft² in interior play space
- 8' Wide, 12' Deep, 8' High
- For ages 3-6
- 1, 015 Lbs
Kids Crooked House
 The Origional
All hand crafted in the state of Maine, the folks at Kid's Crooked House know how to capture the wonderment of being a child with their uniquely created structures. The Original allows you to get your foot in the door without spending too much to get there. Really, the only thing straight forward on this playhouse is the value it'll bring to you and your kids.
- 24 ft² in interior play space
- 4' Wide, 6' Deep, 6.5' High
- For ages 3-6
- 3 windows
- Gable Roof
 The Deluxe
The Deluxe is the next tier up from the Original and offers even more space for the kids to play in. Right from the pages of an absorbing children's book, the Deluxe exudes fun all over. Add in more windows and a dormer, you'll find yourself with the best selling crooked house.
- 24 ft² in interior play space
- 4' Wide, 8' Deep, 6.5' High
- For ages 3-6
- 7 windows
- Gable Roof
WoodManor.net
 The Cottage
Having been in business for four decades, the people behind the craftsmanship at Wood Manor know what they're doing. Because of the general more hands on experience and additional building materials needing to be bought separately, all the kits provided by Wood Manor are more for the DIY minded weekend warrior. The Cottage kit features two levels for the kids to interact with in a very realistic country home.
- 80 ft² in interior play space
- 12' Wide, 8' Deep, 12' High
- For ages 3-8
- 9 windows
- Cross & stepped gable roof
 Kid's Castle
This is a fun one and a real treat for whoever has it come their way. With two levels, two front turrets for that fortress look and a 2nd floor balcony complete this engrossing play castle. Keep in mind that a lot of work will be needed to get this thing %100, but that should be half the fun!
- 100 ft² in interior play space
- 14' Wide, 8' Deep, 12' High
- For ages 3-8
- 19 windows
- Gable & hip roof
 Country Gal
If you still like the idea of a more hands on playhouse kit, but the above two seem a bit intimidating, fear not, for the Country Gal is here. Simpler in design, Wood Manor claims you can easily complete this over the weekend. Don't let the easier construction fool you though, this kit still features lots of space for playing and games, plus a front porch and balcony. Cool!
- 96 ft² in interior play space
- 8' Wide, 12' Deep, 12' High
- For ages 3-8
- 8 windows
- Cross gable roof
 Queen Anne
Wow, this thing is epic. If I were still a kid, I would be beside myself for days if I got this mini-mansion. If you're looking for the ultimate DIY playhouse kit, please look no further than the Queen Anne. Parading about 350 square feet, chuck full of cool accessories and enamoring details. Higher walls also allow for older children to comfortably use this playhouse as well. Best of the best.
- 350 ft² in interior play space
- 23' Wide, 13' Deep, 14' High
- For ages 3-10
- 14 windows
- Cross gable & hip roof
Suncast
 Backyard Cottage
Fine engineering and quality Amish made go into every one of these cute little dwellings. The Backyard Cottage will look great tucked away in any backyard and it's the small things that really make it stand out. Features two dormers and petite front porch make the Backyard so inviting and winsome.
- 72 ft² in interior play space
- 8' Wide, 9' Deep, 8' High
- For ages 3-10
- 4 windows
- Gable roof
 English Manor
Looking for something a little different? This old world style manor is sure to delight. Comes with a arched child sized front door and an adult sized in the back, hinged and gable windows.
- 72 ft² in interior play space
- 8' Wide, 12' Deep, 8' High
- For ages 3-10
- 4 windows
- Stepped gable roof
Axi
 Alice
Alice
Crooked houses seem to be all the rage these days. Being a younger child is certainly a magical time, and playhouses like the Alice can greatly aid in feeding that active imagination. Specially imported Asian cedar wood, Cunninghemia lanceolata, is used to construct all the structure kits for Axi. With five windows and 10 square feet of interior space, your child will feel a cozy sense of home with the Alice.
- 10 ft² in interior play space
- 3' 1" Wide, 3' 5" Deep, 4' 8" High
- 5 windows
- For ages 3-6
 Lisa
Lisa
The next size up from the Alice, the Lisa sports the same crooked design, but with a total of 20 square feet of play space. The 3-6 rage is still the sweet spot for the idea child's age. You also get a front porch too!
- 20 ft² in interior play space
- 5' 9" Wide, 5' 9" Deep, 5' 7" High
- 7 windows
- For ages 3-6
Outdoor Living Today
 Laurens Cottage Playhouse
I like this one a lot! It's all red cedar construction does an amazing job of adding so much character and warmth. The fetching front Dutch door, shuttered gable windows and two level design make for quite an engrossing clubhouse kit. Rustic in design and easy to assemble. This one is a real looker.
- 100 ft² in interior play space
- 9' Wide, 9' Deep, 8' High
- For ages 3-8
 Little Cedar 6 x 6 Playhouse
If you're looking for a mix between a playhouse and a playset, this one is the ticket. Elevated about 4' in the air, allowing for a sand box underneath and a front slide. Add in the premium all cedar construction and you have yourself the perfect outdoor getaway.
- 36 ft² in interior play space
- 6' Wide, 6' Deep, 9' High
- For ages 3-8
 The Sunflower
Another great kit option for those looking for high quality. The Sunflower has all cedar construction including cedar roof shakes. Three opening windows and a front porch with a roof overhang allow more ways to interact and play with this kit. Just looking at it makes me want to go pick out a nice cherry red stain and go to town.
- 54 ft² in interior play space
- 6' Wide, 9' Deep, 6' High
- For ages 3-8
Backyard Discovery
 Scenic Heights Playhouse
Compact in design but still a blast, the Scenic Heights packs a whallop in a small working footprint. Lots of ways for the kiddies to go up and down, there's also room to put a sandbox underneath.
- 54 ft² in interior play space
- 6' 4" Wide, 6' 4" Deep, 7' High
- For ages 3-6
- Gable roof
 Windsor Castle
Castles are a ton of fun and do a supreme job of helping the imagination take you to far off places. The facade mimics real stone walls and battlements and the rock wall to the 2nd level tower is the icing on the cake. Bound to be popular where ever kids are.
- 40 ft² in interior play space
- 8' 4" Wide, 4' Deep, 6' High
- For ages 3-6
Lancaster Country Barns
 Boy's Playhouse
By now you've seen a few companies based out of Lancaster Amish country, and for good reason. The quality these humble people produce is top notch. That is no different for Lancaster County Barns. The "Boy's" playhouse offers a classic gable design with a loft over the front porch. Add in some windows, paint and Voilà, a comfortable kid dwelling is born!
- 40 ft² in interior play space
- 8' Wide, 10' Deep, 7' High
- For ages 3-7
 Victorian Dollhouse
This one is so cute and if you have a little girl, I don't see how they could feel differently. The perfect size for when they're just starting to feel independent, the applicably named Victorian Dollhouse can't help but catch a 2nd look.
- 24 ft² in interior play space
- 6' Wide, 4' Deep, 6' High
- For ages 3-6
Oregon Timber Werks
 The Classic
If you're more of a mountain man type or just going for a more rustic look, the Classic Cottage defiantly qualifies for a fine election. Beautiful, oiled lap siding and mock rough saw lumber construction makes this kit right at home in any heavily wood area. Also comes with working window shutters and Dutch door!
- 24 ft² in interior play space
- 6' Wide, 6' Deep, 7' High
- 3 windows
- For ages 3-8
- Gable roof
EZ - Fit Sheds
 A-Frame 6' x 8'
For a great complete package, you can't go wrong with EZ-fit Sheds. The A-Frame comes with outstanding construction and everything you'll need to build the ultimate child's dream escape. Plus it has a lock and key to keep rouge neighbors out.
- 32 ft² in interior play space
- 6' Wide, 8' Deep, 7' High
- 2 windows
- For ages 3-8
- Gable roof
Other Great Standard Kits
Playhouse Kits
Hobbit Hole Store
Dutch Crafters
Tree house Loft Backyard Play Set
Imagine that playhouses
Economical Playhouse Kits (Under $500)
Waltons
 Honeypot Snug
For a real whimsical playhouse experience for a great value, check out the designs at Waltons. This UK based company offers all kinds of colorful and magical clubhouses. The Honeypot Snug presents itself as a cozy little wonderment all under one small roof. Did I mention it's a great deal?
- 12 ft² in interior play space
- 4' Wide, 4' Deep, 5' High
- For ages 3-6
- Gable roof
 Honeypot Poppy Tower
For a simply delightful provincial backyard retreat, the Poppy Tower is a delight. Elevated to allow for a slide, this rustic wooden kid habitat comes with shatterproof windows, double framed corners and untreated cedar lumber so you can add your won creativity to it's walls.
- 12 ft² in interior play space
- 5' Wide, 5' Deep, 7' High
- For ages 3-7
- Gable roof
Lancaster Country Barns
 Toy Cabin - Starter Kit
When they way starter Kit, they aren't kidding. This little cabin is literally put together like a Lincoln log set. Build it from scratch without need to do any cutting and tear it all back down because you can. You and your child will love assembling and disassembling this thing together!
- 12 ft² in interior play space
- 3' Wide, 4' Deep, 3' 4" High
- For ages 3-5 1/2
- Gable roof
Bosmere
 Little Lodge
A nicely formulated clubhouse for one or two little guys. Produced by an English company from 1926, the splendid all wood framework and reasonable price make this a classy choice indeed.
- 20 ft² in interior play space
- 5' Wide, 4' Deep, 4' High
- For ages 3-6
- Gable roof
E-Z Frames
 6x6 Kit
For something a bit different, try the EZ frame playhouse kit. For a very reasonable price, this kit only includes the framing of a 6x6 structure, and you add the rest, whether it be plywood or bed sheets. Great for indoor child's clubhouses.
Other Great Standard Kits
Backyard Discovery
Gramercy Home
Outward Play
KidKraft
Big Backyard

Free Pallet Playhouse Plan | DIY Project
 If you ever worked at a grocery store, hardware store, warehouse or countless of other locations, you're bound to come across the standard wooden pallet quite often. You would also know that left to their own devices, they can add up and overstay their welcome. The fact that you're here suggests you've asked yourself, “can I turn these pallets into a wicked cool playhouse”? Yes, yes you sure can!
The standard north American pallet consists of two 4' 2x4s and twelve 1x4s and 1x6s. Cut from oak, maple and other highly durable material, pallets can make for a great rustic, home made playhouse enterprise! My motto is, “if it's good enough to carry oil drums for the military, it's good enough to help you kids to carry on a tea party.”
Below you'll find the step by step plan to build yourself a nifty 10' x 10' clubhouse that only the most pretentious elitist would turn their nose up to. If you have 25 or so pallets laying around and a saw, you can build this! A PDF for this plan is also available for download.
Before beginning, I have provided a lumber list for you to carefully go over. Because Paul's Pallet playhouse has a footprint of 10 feet by 10 feet, it's recommend that it be built and used in a flat, level area of at least these dimensions.
To make sure your framing is square, cross measure the corners to check if they're equal or use the 3,4,5 rule. When it comes to framing, use two, 3” decking screws to connect 2x4s together, three decking screws for 2x6s, etc. Check out this page for more comprehensive framing instructions. Make sure to paint all the exterior lumber to keep it safe from the rain and other elements. Be advised that if an exact 8', 10' and 12' piece is required, you may still need to cut it as they can vary in length by up to an inch. Don't forget to also look at the FAQ page too. Happy play housing!
Lumber List:
Pallets:( 22 ) 40” x 48”
Framing:
2” x 4” x 8'
2” x 4” x 10'
2” x 6” x 10'
Flooring:
( 4 ) 1/2 Plywood Sheets
Constructing Paul's Pallet Playhouse:
Step 1: Framing the Floor Joists
From (8) 2x6x10s, cut and build the floor joist unit shown in the below illustration. Cross measure the corners, or use the 3,4,5 rule to make sure the box is square.
Step 2: Flooring
From (4) ½” sheets of plywood, cut and install the six pieces to the top of the joists as depicted in the below illustration.
Step 3: Walls Pt 1
From (9) pallets, assemble the first part of the walls as depicted in the below illustration.
Step 4: Walls Pt 2
From (2) 2x4x10s and (6) 2x4x8s, cut and install the ten pieces to the top of the pallets as shown below. From (1) pallet, install the door as shown in the 2nd below illustration.

Step 5: Walls Pt 3
From (5) pallets, build the unit shown in the below illustration. Install this unit to the top of the playhouse as shown in the 2nd below illustration.

Step 6: Rafters
From (7) 2x6x10s, cut seven of the rafter shown in the below illustration. Use (1) 2x4x10 for the single 10' piece. Install these rafters and 10'piece to the top of the playhouse as shown in the 2nd below illustration.

Step 7: Roofing
From (5) pallets, attach approximately forty five 3' 4” pieces to the rafters as depicted in the below illustration.
Step 7: Railings
From (2) 2x4x8s, cut four 4' pieces. From (1) pallet, install the rails with a 4” space between them. See the below illustration.
A 2nd, mirrored rail will also be required. Install these two rails to the front of the playhouse as shown in the 2nd below illustration.


Top 17 Free Playhouse Plans on the Net

There's quite the variety in the listed plans too. Clubhouses, castles, play-sets, cottages and tree houses make up the roster of cool stuff you can build at little cost. Even if you're a first timer when it comes to carpentry, if you got the basic tools, you'll be able to tackle most of the projects listed below.
Of course, if you're willing to spend a little bit of cash, your possibilities open up considerably. Starting with this website, we offer over 70 different types of plans for sale that range in large scale in terms of size, detail, themes and cost. Basically the more time I spend designing it, the more it's going to cost. However, if you're up for the build, it's well worth it.
All the plans hosted here, both for sale and for free are all in digital format and can be downloaded at anytime and saved to your device.
Other great playhouse plan resources include Woodmanor.net, Familyhomeplans.com, Aplaceimagined.com, Coolhouseplans.com, Treehousesupplies.com, Pirateshipplayhouseplans.com as well as loads of books from the likes of Amazon.
Well, let's dive in shall we?

Far from doing just playhouses, Buildeazy.com has all kinds of quality free plans ready to go on any number of wood projects. If you're looking to build any outdoor furniture or knickknack, check these guys out first. As for kid's play structures, the play cottage makes for an excellent choice for younger children. Not being too large also helps when it comes to saving money on material. Plus that intersection of four hips and valleys is just snazzy.

This one is a bit different from the usual mental image of a backyard playhouse, but it certainly gets the job done, and done well. Comes with two levels and some overhead shelter for when the skies have nothing better to do but drop stuff on your parade. Plenty of step by step instructions with clear images make it a lot harder to get confused on your way to play fort perfection.
 3. Backyard Playground
Ah, the traditional residential swing set / play-set. Andy, the math teacher who put these plans together, claims that by using his plans, you'll save over 70% as opposed to buying a swing set from your local box hardware store, and lays his findings out for you to see for yourself. So not only are the plans free, but you won't have to pay for the middleman labor either. Nice!
 4. The Outdoor Play-set
Another backyard play-set. blueprint with lots of pictures and instructions. This one even includes a video too! There's also a metric ton of other free designs for all kids of stuff your can build and scatter throughout your house and property, like sheds, chicken coops and furniture. Make sure to check this one out!
 5. Kid's Bungalow
Who doesn't want their very own bungalow. Just saying the word is half the fun. This design features a shed roof and square footprint. Lots of pictures, instructions and a material list too. Rayan, the site's main content contributer, created quite a bit more content than just playhouses too. You'd be missing out if you didn't investigate the other useful blueprints housed within.

6. This Old House's Fort
I love this one, and is favorite of the free plans simply because it is so simple. It's a fort and that's pretty much it. No thrills, dohickys or thingamabos. Made from fencing and 2x4, there's nothing really to it, but there it stands. Elementary yet adept. I want one.
 7. Popular Mechanic's Playhouse
This one comes straight from a 1985 issue of the Popular Mechanic's magazine. Not quite as intuitive and easy to follow as some other other wares featured above, but the architecture of the playhouse is still pretty unique and worth at least looking at and considering.
 8. DIY Clubhouse Play-set
This is probably the most elaborate, ornate and highest value plan on this list. The 19 page PDF goes over every part of the design in detail, from the rafters, shutters, door and swing set. Truely a really beautiful design that can be download for absolutely nothing at all. Definitely one to consider.
9. Children's Playground
A more sophisticated play-set. for the kiddies who have been good all year. Includes a sandbox, exit for a slide, two swing bars and gang plank. For not too much in material cost, you'll soon have a full fledged kid exhaustion work station!
 10. Tree house Wood Plans
This one is just cool. While not technically a “tree house” per-say, this composition features an elevated house to achieve a tree house feel. Nothing too crazy, but contains some charming details like a lookout tower, bucket and pulley, ornate door and some other neat stuff. A good value indeed.
 11. A-frame Tree House
Another fun tree house plan that now also incorporates a tree into the mix. A-frames are a classic clubhouse design kid's have been building since the beginning of time, and someone got the funny idea to stick it up in a tree. All the illustrations are hand drawn and come with a material list and instructions. Have fun!
 12. Ana White Playhouse
This one gets shared a lot around the web and for good reason, these are some solid blueprints to get an inexpensive child's dream home come true. Full material and cut list also take away the hassle if you're new to the carpentry field. After a little paint and roofing shingles, your kids will love you forever, or 3 days. Which ever comes first.
 13. Plywood Playhouse
The design of this playhouse wouldn't look out of place if it were designed by the Amish themselves. Features a gable roof, inviting front porch and plenty of windows.Professional and straight forward. Begin by framing out everything and then slapping some plywood on top. The end result is guaranteed to look good in anyone's yard. That is, as long as you got the tools.
 14. DIY Playhouse
Sometimes it seems that the more facile a project is, the more love it receives. Simple in layout, but still a looker, this playhouse doesn't feature too many details but offers lots of charm to make up for it. The perfect spot to have a tea party with all of your favorite stuffed animals friends.
 15. Sweet Pea Bunk Bed
Yes, there are indoor ones too! Plus it's a bed for not one, but two of your favorite little ones. Aimed at the more feminine demographic, this blueprint really has much to offer in beauty and detail. If you have the time, patience and love for woodworking, this'll make for a really special treat.
 16. Reading Nook
If you're really looking for something simple and as little damage to the ol' bank account, this plan is for you. Very few cuts with a circular saw and lots of pillows make up most of this reading retreat. Not quite the best for rainy days, but the compromise is still worth considering. 17. "Playhouse Plans Free"
Another great playhouse plan that should not be overlooked. Covers everything from the joists, decking, studs roofing and siding. A truly comprehensive blueprint that will make for a cool project. Plus it's cute.
 18. Paul's Outdoor Hideaway
Of course I'm going to include one of my plans in this list too. The outdoor hideaway is a little plain, but in terms of ease to build and damage to your wallet, I haven't heard too many people complain. Don't forget to check out all of my free play plans too!
How to Attach Rough Framing Together with Screws and Nails
 For those without much experience in construction and carpentry, or just need a refresher, sometimes the basics need to be made concise and clear. If you've already considered your foundation type and picked out what materials you'll be using to build your playhouse, it's now time to review how these components should be fitted together.
This framing outline has been designed to help guide you through the process of how to nail and screw lumber together. The methods for attaching lumber described below do follow most residential construction codes, though it's recommend you check with your local requirements.
Note that all the playhouse plans include a lumber list. Using this list and the fastener instructions below, the near exact hardware count and price for every plan can be extrapolated.
Recommended Types of Nails, Screws and Bolts
 When building your playhouse, use 3” decking screws or 16d nails to secure all 2x material when building walls, joists, rafters and ladders. Use 2” decking screws or 12d ring shank nails for securing all 5/4” x 6” material. For posts, use ½” galvanized carriage bolts with a washer and lock washer.
Screws generally have more holding power compared to an equally sized nail and are much faster to remove if a mistake is made. Because of this, screws are recommend over nails for your playhouse project
.
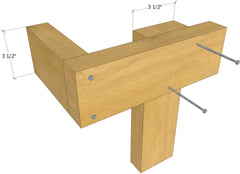
Framing Walls, Joists, Rafters & Ladders
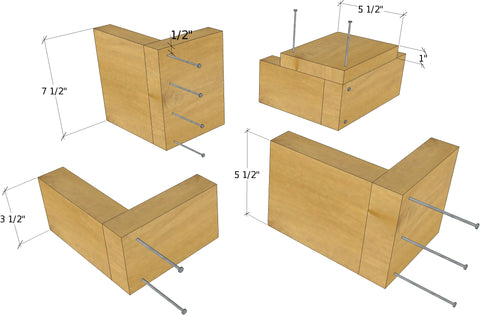
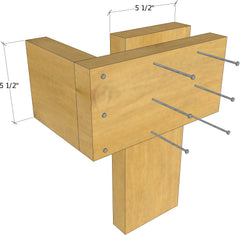
When it comes to fastening framing together in the form of walls, joists and other scenarios, where the ends of 2x lumber is prone to cupping or twisting, the first and last fasteners are the most important as they are doing most of the work keeping those pieces in place to prevent warping. In all cases, keep the nails or screws centered (¾” from the edges), and keep first and last fastener a ½” from the top and bottom of the lumber. In the cast of a 2x4, there will only be a top and bottom fastener, but in the case of a 2x6 or something larger, there will be some in the center. Basically for every step up from a 2x4, another fastener will be used.
Scab & Sister Joists
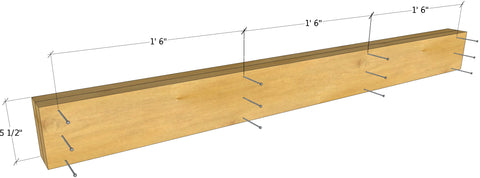 When two or more joists are directly next to each other, they need to be attached to each other every some may inches. Most codes required that they be screwed or nailed every 18", from both sides, with the correct corresponding number of fasteners to the 2x size. For a playhouse, securing the joists every 18" from one side, with just a top and bottom fastener is plenty.
Decking
Decking boards only come in one width and height: 5 ½” x 1”. Every joist that a decking board travels over should be secured to. However, unlike a 2x6, only two fasteners, top and bottom, will be needed.Posts
 All 4x4 post should receive two ½” carriage bolts, top and bottom and opposite each other. Unlike the screws and nails used in the above examples, two ½” holes will need to be pre-drilled before the bolts can be installed. 5 ½” long bolts can be used with most of the posts in the hosted playhouse plans. All bolts will need a washer, lock washer and nut.
 Headers & Window Units
 Headers are usually made of 2x4s or 2x6s and 1/2" plywood. For 2x4 headers, two 3" screws on the ends and two every 16". Use three 3" screws for 2x6 headers, four for 2x8, etc.
Like laying out walls and joists, use two 3" screws for each 2x4 intersection. If two or more studs are parallel to each other, screw them together every 24".
Toe Nailing/Screwing
 There may be a few circumstances where "toe nailing" will be required. This could be for securing joists to a foundation, rafters to a lower plate, or connecting angled pieces together.
Depending on how the two pieces are angled you wish to fasten, start by tapping in the nail at a 90 degree angle. After the nail has started to grab, bend it to the direction it needs to follow, and continue hammering or screwing until it is fully inserted. This is most often found on your more whimsical or "crooked" designs that are less conventional in layout.
Plywood
When installing plywood to your playhouse, use a 2" or 2 1/2" screw every six inches along the exterior and any interior perimeter of each piece. When screwing in the "field" or across the rest of the piece, screw down every 12" to any available stud, joist or rafter behind.
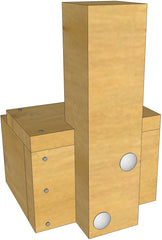
Monkey Bars
To install monkey bars to your playset, we recommend using 1½" wooden dowels fitted between two beams of lumber. You'll need a 1½" drill bit, hammer, construction adhesive and R4 screws to drill out and install the dowels in place.
Larger Screws
You may encounter a few spots in your project where a larger RSS type screw may come in handy, especially if some of the lumber is warping or bending from drying out. These types of screws can be used to suck uncooperative pieces back together.
Other Resources
If you found this page to be helpful in how to construct your playhouse project, be sure to also check out how to make larger than 45 degree cuts, how to add a swing set to your playhouse and how to reduce unwanted movement in your playhouse platform.

How to Stiffen a Wobbly Platform
No one likes a wobbly, shaky playhouse. Not only is it unnerving, it can be dangerous if too many people are on the platform at the same time. This phenomenon is also exacerbated when the posts holding up the platform are buried to shallow or aren't dug into the ground at all, but rather just sitting on top of the grade. Below we'll explore just exactly how your playhouse platform can be made nearly as solid as a rock.
Methods to Help Stiffen a Platform
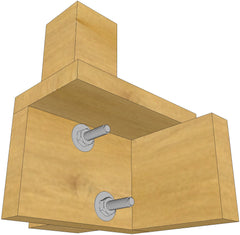
There are several ways to remedy this problem. One is to have the offending posts dug into the ground and concrete poured about two through four feet below the grade, depending on where the frost line is in your area. For 4x4 posts that are less than 6' in height, this may be all you would need. For taller posts set in the ground, switching from a 4x4 to 6x6 can aid even more, though they are more cumbersome to work with.
Another option is to add pieces or sheets of plywood connecting the corners. Although this can work quite well in creating a stable play-set deck, it's usually quite unsightly, element prone and restricting.
By far the last thing you would want to do is simply add more posts. This only helps with greater vertical loads but does nothing to assist in the horizontal directions where all the swaying occurs.
Types of Cross Bracing
By far the easiest and less intrusive method to help lock up a platform is cross bracing, either with angled lumber, metal, PVC piping or cable. For typical exterior deck and playhouse construction, angled 2x lumber is easiest and most readily available. However with taller platforms, lumber can present itself as ugly and bulky, while also restricting underneath movement. That leaves us with cable cross bracing. Let's look at what hardware we'll need.
Hardware:
- Enough cable to make an end to end "X" between the two desired posts
- Two turn buckles
- Four eye bolts that'll pass all the way through the posts plus a little extra
- Four washers
- Four nuts
- Four thimbles that match the cable gage
- Twelve fist grips that match the cable gage
Tools
- Drill
- Drill bit that matches the eye bolt
- Angle grinder or cable snips
- Adjustable wrench

Installing the Cross Cabling
First, before any hardware gets install to the posts, two of the thimbles must be connected to two of the eye bolts. I find it easiest to use two wrenches or a vive and a wrench to open up the the thimbles so that they can be connected around the eye of the eye bolt.
A quick link can also be used to prevent the need to put the thimble over the eye bolt. If you go this route, make sure to get the next size up as the quick link will probably be the weakest link in the chain.
 Now that two of the thimbles have been attached, install all four eye bolts to the posts by drilling two holes, a few inches away from the bottom and top, in each. Slide in the eye bolts and install the washer and nuts. Both of the turn buckles should be about 90% extended and attached to two of the eye bolts. The other two thimbles should now be attached to the ends of the turn buckles.
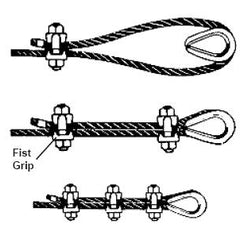 Now it's time to actually install the cable. Measure the distance between the end of the turn buckle and the eye bolt the cable would connect to. Add 10 inches to this measurement and cut that length. The cable will be held in place around the thimbles with three fist grips on each end. See the illustration on how to properly install these three fist grips. The cable should be slightly loose though this process so that it can actually be worked with. When both sides have been firmly secured, tighten up the turn buckle. You should now notice a significant improvement in your deck's stability.
Depending on how high the posts are, if they are buried, how much weight is up top and just how much adverse movement you're willing to tolerate, this may need to be done on all the posts, and should be if you want the most solid platform experience.

How to Cut More Than 45 Degrees With A Circular Saw
For most woodworking tasks around the house, such as wall framing, fencing or building a garage work table, the great majority of connections will be square joints. In these circumstances, you'll probably never need to set your circular saw greater than 45 degrees to make an acute angle.
However, if you're planning on building something a little more elaborate, such as a child's outdoor playhouse, there may be a few times where this will be a necessary skill to have in your arsenal. Below I will describe the procedure to make these more difficult angles.

Suppose we want to make a 60 degree bevel cut on the end of a 1' 2x6 board. You may think it would be alright to start off with a piece identical to the one shown above, but that would be an incorrect assumption. The one shown above is unfortunately too short. Instead, you'll need another inch to work with in addition to your original measurement to make the correct cut.
Because our circular saw can't make a 60 degree cut, we'll instead need to make two cuts that'll equal 60 degrees. First, we'll need to do a little first grade math.
1. Subtract the desired angle from 90 and cut that in the opposite direction.
In our case, that angle would be 30 degrees. This will be the angle we calibrate our circular saw too. When this angle is set, cut the board along the original measurement with the saw blade angled in the opposite direction of the future 60 cut. When finished, it should look like the below illustration. Now you can see why we couldn't just use a 1' board.

2. Make a 90 degree cut along the edge of the bevel
Now that we have out first beveled cut, we can set our circular saw back to zero to make a 2nd, 90 degree cut. Make sure to secure the board firmly before proceeding. Using both hands, run the saw right along the edge of the 30 degree bevel. In other examples, if the angle is steep enough, the circular saw's blade depth may not be enough to reach all the way though and will require a hand saw or reciprocating saw to finish the cut. When the 2nd cut is complete, you'll be left with a 60 degree angle in your board and a little right triangle
This method will work with any angle over 45°. Some circular saws can cut up to 50 degrees and some miter saws can even get to 60°. If you're going to be making a lot of these types of acute angles, or just lots of cuts in general, a good miter saw may be worth the investment.


All of this is assuming, of course, that you're comfortable with working with a circular saw and holding it on strange angles. The traditional way to cut these types of angles is with a good ol' hand saw. Simply mark your angle with a speed square, mark the plumb cut and saw away.
If you found this helpful, check out all of our other guides and articles in helping you with your outdoor projects!

Free 6x6 DIY Playhouse Plan | Outpost One

Paul's Playhouses gives you the ability to add that recess fun to your own backyard. Whether it's as simple as the free plan shown below, or one of our more elaborate designs, getting kids out of the house and into the great outdoors is the goal.
The plan below, named Outpost One, is a great way to begin that adventure. Sure you can go to a department or chain hardware store and buy a pre-made plastic kid house, but it's just not the same as building your own unique creation, whether it's simple or complex. The steps shown below are reminiscent of all the playhouse plans hosted here, with a lumber list, 3D images and fully detailed angle and dimensions. Don't forget to also check out the other free plans too!


When it comes to framing, use two, 3 1/8” R4 screws to connect 2x4s together, three R4 screws for 2x6s, etc. When attaching 5/4” x 6” decking material, use two, 2/ ½” R4 screws, about 3/4” away from the edges to attach them to framing. Make sure to paint all the exterior lumber to keep it safe from the rain and other elements. All 2x and decking material should be pressure treated as it'll be out in the elements. Be advised that if an exact 8', 10' and 12' piece is required, you may still need to cut it as they can vary in length by up to an inch. Happy play housing!
Tools & Lumber that will be needed:
Pencils
Measuring Tape
Speed Square
Hammer
Drill &/or Impact Driver
Circular Saw
Sander
Decking:
( 3 ) 5/4” x 6” x 10'
( 9 ) 5/4” x 6” x 12'
Framing:
( 1 ) 2” x 4” x 10'
( 9 ) 2” x 4” x 12'
( 6 ) 2” x 6” x 8'
( 2 ) 4” x 4” x 8'
( 1 ) 4” x 4” x 10'
( 2 ) 1/2 Plywood Sheets
Constructing the Outpost One Playhouse
Step 1: Back Wall
From (1) 2x4x12, cut
a 6' piece and a 5' 5”
piece. From (1)
2x4x12, cut four 2' 9”
pieces. Assemble
these pieces into the
unit shown in the below
illustration.

From (1) 4x4x10, cut and
install the two 4' 10 1⁄2” pieces
to the above unit as depicted in
the below illustration.

From (1) 2x4x12, cut two 6'
pieces and install them to the
top of the 4x4s as depicted in
the below illustration.

Step 2: Front Wall
Repeat the instructions from
step 1 for the front wall, except
use (2) 4x4x8s for two 6' 4 1⁄2”
pieces, instead of the two 4' 10
1⁄2” pieces. See the below
illustration for details.

Step 3: Side Walls
From (1) 2x4x12, cut two 5' 5”
pieces. From (1) 2x4x12, cut
four 2' 9” pieces. Assemble
these pieces into the wall shown
in the below illustration.
From (1) 2x4x10, cut one 5' 5”
piece and two 1' 9 1⁄2” pieces.
From (1) 2x4x12, cut four 2' 9”
pieces. Assemble these pieces
into the wall shown in the below
illustration.
Step 4: Siding
From (9) 12' decking boards, cut eighteen 6' pieces. From (3) 10' decking boards, cut twelve 2' 1”
pieces. Install these pieces to the four walls of the playhouse as depicted in the below illustration.
Space the boards 1⁄2” apart from each other.
Step 5: Rafters
From (6) 2x6x8s, cut six of the rafter depicted in the below illustration. Install them to the top of the playhouse as depicted in the 2 nd below illustration.

Step 6: Roof
From (2) sheets of 1⁄2” plywood, cover the top of the rafters as depicted in the below illustration.

A PDF version is also available for download

10 Things to Consider Before Building a Playhouse
With the weather getting warmer and the kids starting to get older, you may be looking for a way to encourage them to put down the game controller and spend some time in the great outdoors, even if it's just your backyard.
You could purchase one of those pre-made playsets from a big box hardware store, but you yourself are looking for a fun project both you and your child can engage in. You both decide that building a playhouse is a great idea and something you'll enjoy constructing together. But before you dive right in, there are a few things you should take into consideration first. Here is my list of 10 things to consider before starting a playhouse.
1. Assess Your Skill Level
Be honest with yourself. Can you preform the most fundamental acts of carpentry? Things like properly reading a tape? Making a compound cut or even making a straight cut with a circular saw? If using a chisel, swinging a hammer or making a 30 degree cut with a circular saw seems overly intimidating, you may want to consider the costs of hiring a local handyman to aid you in the build. If you think you can handle these beginner concepts, you probably can build at least a simple wooden playhouse.We offer a varying degree of playhouses with the most simple being the free outdoor hideaway. If that is a bit too plain for your liking and want something a bit more elaborate and challenging, we recommend trying your hands on our classic playhouses or even the full-sized playhouse plans. Which ever design you ultimately choose, be forthright with yourself and don't bite off more than what you can chew.
2. Analyze Your Budget
This is another major limiting factor that defiantly should be considered before starting any project for that matter. You may be the best carpenter in the world, but if don't have two dimes to rub together, you aren't going to get too far with your playhouse project. For even smaller playhouses with the most basic building materials, the final cost of the lumber, paint, brushes, roofing material and miles driven back and forth to buy this stuff can cost you no less than $200-300 for the most basic design.
For most people, expect to spend between $700-1200 and up and over $4000 for the large and elaborate designs offered on-line. One important thing to remember, however, is that despite spending several hundred dollars on this endeavor, it is still far cheaper to do it yourself than hiring a professional to come in a install it for you. Most of their cost is the labor and usually accounts for over 2/3 the asking price in many cases.
3. Tools ⇢
Do you have the tools, or to rephrase, the right type of tools for the job? There is also a difference between absolute necessity and convenience too. Circular saw? Absolutely necessary. Miter saw? Very helpful but still a convenience. Here is a quick list of the two.Absolutely necessary:
- Pencil
- Speed square
- Hammer
- Tape measure
- Circular saw
- Drill
Convenient:
- Miter Saw
- Table Saw
- Reciprocating saw
- Jig Saw
- Impact Driver
- Sander
- Chisel
It's up to you to decide if having any of the nicer more convenient type of tools are worth trading saved time and hassle with the cash you'll have to part with.
4. Yard Space
How big is your yard? You may have enough room to build a large barn design, but will there be enough room for the other activities you use it for? Even if you have enough room for several playhouses, it may not the most aesthetically pleasing idea. Most of this is just personal preference, what you are will to tolerate for the next ten years.
One important thing to keep in mind about building on your land are property setbacks. Often there is a no-build-zone surrounding the edge of your property. Check with your township on the exact setback distance for you. This leads right into the next thing to consider.
5. Neighbors
Before building anything, taking the first step in diplomacy and taking to your neighbors about your construction plans is almost always a good idea. I've witnessed several times where neighbors come out surprised and angered that there is a new tree house or zip line being installed very close to their properly. We've even had township inspectors stop by based on passive aggressive neighbors who didn't approve of the new playhouse being installed. While notoriously mean nearby residents might deserve a 2nd thought, normally communicating with your neighbors is the idea choice.6. Choosing the Type of Playhouse
Now we're getting to the fun part about all this decision making. Talking with your kids and going over the many different styles, sizes, colors and accessories is the most rewarding part before the thing actually gets built. Are you and your kids looking for a more traditional house style playhouse or something different, like a pirate ship or a fire engine? There are all kinds of options to pick from, just make sure to keep these other pointers in mind when making that decision. I also recommend looking at what makes a good child's playhouse.7. Lumber Type
This isn't one many people think about at first but it's still very important, especially for keeping the budget in check. Some people simply want the best, but the best is expensive and hard to find. Others want to cheap out when really they should have spent a little more money to get something that'll last. Our building material page goes into more detail, but here is what you generally should do.If you have a playhouse that has a water tight roof that protects the entire structure, normal non-pressure treated lumber is fine. This can include pine and Douglas fir. Cedar, mahogany, red wood or something else is fine, but the only downside is that it will cost you more. However, a project that is partially or fully exposed to the elements, something more than normal lumber is a must. The most cost effective method is to use pressure treated lumber. There have been concerns regarding the safety of PT wood and children, but with modern preservation techniques, these suppositions are not warranted.
Cedar, red wood and other harder material is fine too. Painting or staining your playhouse is another great idea for preserving the lumber too. For non-pressure treated types, it can be applied right away with no negative repercussions. For pressure treated, waiting about a year is the best approach, as new pressure treated lumber is already saturated and won't take paint or stain very well.
8. Time management
Along with your skill and budget limitations, what time resources do you have to get this project off the ground? Are you week day and week ends always filled or have expected activities popping in? Maybe this is your busy season and just need to wait it out until your schedule flattens out. Whatever the reason, make sure that you'll be able to allocate the necessary time to build your child's playhouse. For most people, it can take 2-3 full days to build a normal clubhouse, and up to a week for the large projects. Of course, this all can be accelerated if...9. Hired Help
Whether it be a family member, friend, neighbor or professional, getting someone to help is always a breath of fresh air. If they're more knowledgeable than you, it can be a great source of peace of mind.
Even if they have your same skill set, it can really help make the project go much faster. Having someone help hold a piece in place or carry lumber around can really take the stress off and make the entire project much more manageable. If you have someone in the roster who is willing to help, defiantly take advantage of that opportunity. Building playhouses can be a very social thing too!
10. Longevity
How old are your kids? A playhouse that appropriate for a 4 year old may not be so great for a 7 or 8 year old. When you're looking at the differing designs and sizes of the playhouse plans out there, don't just think about what will be great for them right now, but what will be great 3 years from now. Smaller playhouse plans designed for the 3-5 year olds don't carry the longevity that larger designs inherently have. Unless you're the really active, type A type that is always looking for a new project, looking ahead a few years at what your kids will grow into can be a worthwhile investment.
7 Coolest Kid's Castle Plans on the Net

I looked all over the net to find the best castle blueprints the inter-webs had to offer. I will say I was constantly bombarded by a certain fellow by the name of Ted who kept peddling his pirated compilation of stolen plans, but I digress There were many excellent websites I came across and offered plans, both free and for purchase. Here's my assortment of seven DIY Castle playhouse websites and blueprints for download.
Free Castle Playhouse Plans:
Paulsplayhouses.com Since this is my website blog, I feel no remorse for listing my free castle fortress first. While certainly not the most simple blueprint, it certainly shouldn't give anyone with some power tool confidence a second guess. With less than $200 dollars in materials, it won't thin your wallet to much either. If you are feeling a bit more ambitious, I also offer progressively more and more elaborate, larger and detailed castle clubhouses that I would have loved to have, but must now relent to vicarious adulthood.Popular Science This plan comes from a 1986 copy of Popular Science. Very simple and made just from plywood, I had a bit of a hard time understanding what exacting they were instructing me to do, but the finished product looks pleasant and certainly won't cost you too much to complete. Hey, it's free! We'll take it.
Buildeazy.com The people at Builder offer many excellent, simple and easy to follow step by step blue prints for all types of wood working projects. Their “Kid's Castle Playhouse” is perfect for the younger sets who don't have terribly high demands. Makes for a great addition to a kid's indoor play area.

Ana-White.com Not all these plans have to be strictly for recreation, they can act as a place to sleep too. A perfect project for you and that special little somebody in your life, it comes complete with a slide and stairs. Your child will really feel like the ruler over their domain sleeping up high, behind their castle battlements and curled up in a good book before bed.
Priced Castle Playhouse Plans:
Castleplayhouseplans.com Once money starts changing hands, the size and quality of the blueprints start to increase. That is certainly the case with this website. Offering a 2 level play fort with space for a slide, battlements and a ramp, this play-hut is a noble contender. Plans start at $50.Joesplans.com Joe offers several differing types of forts, structures and plus doll houses for kids. This mid sized castle is great for a family of four. Plans start at $10.

6 Cool Pirate Ship Plans From Around the Net
 Ahoy, me Hearties! Watch out, it's time ter get started on a piratey project, me ship!
For some reason, kids are fascinated by ship playhouses. When you see a playhouse that doesn't consist of the typical four walls and a roof, it's probably going to be a pirate ship. I can't blame them either. Ships typically offer 2 or 3 levels to play on, along with slides, climbing walls, secret compartments and of course, the ship wheel. If building your kid an illegal pirating vessel that in no way can float, you're making a good choice. I've scoured the Internet for serious DIY pirate ship blueprints and compiled them all below.
Surprisingly, there aren't that many websites that offer plans. To expand your options, I've also included companies that will offer you a pre-built project and ones that'll come out and construct them for you as well. We'll of course with the plans that I offer.
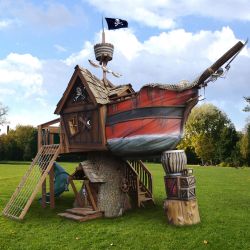
Paulsplayhouses.com
 I have two different types of pirate ship plans that you can download. The first is a large ship that comes with three levels and has a footprint of 22' by 7' and widens out to 34' by 11'. The cost to build is around $2,500. The small ship has two levels and will cost around $1,500 to construct.
If you have been around a speed square, circular saw and a miter saw, you'll be able to tackle the larger ship. If you're just getting started with woodworking, I would recommend you pick the smaller one for it's simpler and smaller design. Either way, I know you're kids will have a great time raiding innocent folks for their lore.
Pirateshipplayhouseplans.com
Started by a fellow named Steve Chancey back in 2011, Pirateshipplayhouseplans.com was started when Steve couldn't find a website that offered pirate ship plans, so he made the plans himself! A few other playhouses have been added overtime, but as for pirate ships there are two models: Large & Small.
The original, larger sized ship was the first plan to be provided when the site launched. It has a 18' by 8' dimensional body and features three levels, plus a crow's nest and gang plank. The smaller ship has a 10' by 6' dimensional body with two levels and compact design. These clubhouses have proven to be popular and judging by the comments, are well enjoyed by those two have built them.
Pirateplayships.com
 Derek Hinckley, the owner of pirateplayships.com, started his company after building a pirate ship for his kids and knew he had to share these with the world. Derek will come to your home and construct the entire project for you, but also offers plans to build his large and medium pirateships as well. Prices for the plans start at $250.
Pre-Built Pirate ship Playhouses
Although that is basically it for down-loadable blue prints, you can opt for a fully made pirateship too. Prices very widely for the size and quality you desire. Let's take a look.
hammacher.com
This website offers an extraordinary detailed pirateship playhouse no child would ever be able to fully appreciate in their youth. The attention to detail is exquisite and the woodwork is downright impressive. Obviously this much detail wouldn't transverse into a set of plans very well in the slightest. Of course, something this professional looking will come with a professional price tag: $27,000. It's still worth taking a look.
Amazon
If you're hunting for a bargain and want something small and easy, why not go with this cute cardboard kid's pirateship? Easily the most economical item listed here, there is no hassle with measuring and cutting. Best for younger kids.
Playhousedesigns.com
 If you're in the market for high quality indoor pirate playhouses, you're in luck. Playhousedesigns offers all types of indoor clubhouses, and two fine grade, olden ship play sets kids will love.
Woodenplayscapes.com
Last on the pirate ship playhouse roster are the wooden boats found at woodenplayscapes.com. There are so many great options to pick from, it may be hard to finally settle on just one. There are a total of 10 different types to choose and the prices very greatly, from about $5,000 to $20,000. Many include slides, bridges, cargo netting and more. They are located in Michigan so if you're near by, you're in luck.
Conclusion
When I was younger, I wished I could have some type of cool playhouse or tree house my friends and I could hang out in and do whatever. That never quite came to be, but now with the dawn of the internet, the options to make something like that happen have exploded. There's little reason why you get your kid's off the shore and into their imaginations. So what is stopping you from getting this done?
If you have any questions about the plans I sell, please send me off an email. I do encourage you, if there is an ounce of DIY blood running through your veins, to take up a circular saw and build something for yourself. It's a lot of fun!
Hoist the anchor!