A Comprehensive List of Playhouse Kits
There's many happy DIY minded people who can work a screw driver and hammer, but the idea of building a complete outdoor playhouse from a pile of lumber and box of screws from the local hardware store seems a little too intimidating. While Paul's Playhouses offers many differing types of kid's play plans to pick from for those with the knowledge and frankly, the time, there are also a great variety of professionally prebuilt clubhouse kits you can purchase and be delivered right to the end of your drive way.
Why Buy a Playhouse Kit?
Playhouse kits usually offer more particulars and choices than a scratch project can reasonably afford. Almost all of the below kits are produced in a warehouse or assembly line where tight tolerances are kept, giving the structures a quality and state of precision most people wouldn't be able to achieve. Despite children's playhouse kits being a bit of a niche, there's no denying luxury and economical market for artisan child's clubhouses. Don't forget to add some cool accessories to your new outdoor abode too!
Preemptive Questions
Before beginning the order process of any one of the units listed, it's important to keep a few questions in mind so that you'll know what you're getting yourself into. Some are more obvious and other's less so, but all should be considered before buying.
- What will the shipping cost and delivery time be?
- Will I need some help in removing the kit off the delivery truck?
- What is the return policy like? Is there a restocking fee?
- Are there any hidden fees?
- What tools and additional materials will I actually need to complete the project?
- Do I honestly have enough room in my yard for this sized playhouse?
- What are the township codes and regulations like?
- How will the neighbor's react?
- Does my home insurance need to be informed of the new structure?
- How watertight is the building?
- How many man hours will it take to complete the playhouse assembly?
- Am I getting the best playhouse for the age and number of my children?
- How do other people speak about or rate this kit?
- Should I consider using a professional to help me in the assembly?
As can be expected, playhouse kits can vary wildly in terms of size, target age group, difficulty in assembly and especially price. Many of the structures below come with a great number of add-ons and options that can more than double the total cost. Categorizing by brand, we'll cover all these vacillating situations so that you can make the best decision for you.
Helpful Tips
The best bit of advice, whether you're buying a kit or a plan, is to think through the entire process and consider the issues that may crop up. Unless you opt for a fully constructed design, there will be some assembly required. Depending on which of the many models chosen, some will require more work than others to complete. Before you give them your credit card info, make sure to have these principles in mind.
- If the playhouse is made of wood, check to see if it's been treated in anyway. Cedar and pressure treated lumber doesn't necessarily need to coated, but it will weather and turn a silver color after a year or so. Applying a stain or outdoor grade paint will increase the lifetime of the structure by many years. Some stains may need to be applied every few years.
- If you would still like to try your hand at building something for the kiddos in addition to the kit, the free swing set plans make for an excellent choice for an additional accessory!
-
If you don't have any flat grade on your property, you may need to build an island deck for the playhouse to rest on. This will require digging holes, pouring concrete or using blocks and framing joists, much like an attached house deck.
-
When choosing the size of the playhouse, make sure not to get something the kids will outgrow quickly, but also not something so large that it'll loose the child scale intimacy they'll need to desire playing in it. Placing stakes and string on the ground to simulate the walls is a great way to see if your children like the size they'll be receiving.
-
If you're looking to maximize the use of your child's new 2nd home, also consider hiring a electrician to wire up power. This opens up the option for keeping the lights on when the sun goes down and powering a space heater in the colder winter months. Maybe even providing a spot to charge their ipad if they've been good.
-
Just because you're buying a kit doesn't mean that the kids can't help adding their own creativity too it. Usually the interiors have not been painted, resulting in loads of free space for them to help color and decorate. All the empty interior space will need to be filled too. There are many on-line and brink & mortar stores that offer child sized furniture I'm sure they'll love to help pick out.
-
The area around the playhouse shouldn't be ignored. The immediate landscaping around the structure can add a lot of personality to an otherwise plain edifice. A flag stone path, white picket fence and well placed plants and foliage go a long way.
Luxury Playhouse Kits (Over $5000)
*Note that many of the brands listed below offer more kits than what is shown, but for space reasons we can't show them all.
Lilliput Play Homes
 Grand Victorian
When you purchase a playhouse from Lilliput, you know you're getting the best. This beautiful mini-mansion is the pinnacle of picturesque youth living, and the Grand Victorian spares no details, inside and out. Features exquisite trim work throughout, skylight, strained glass windows and a working door bell.
- 150 ft² in interior play space
- 17' Wide, 9' Deep, 9' 4" High
- 13 windows
- For ages 3-7
 Sassafras Castle
Short of hiring a professional to build you a custom citadel, the Sassafras Castle is the cream of the crop when it comes to children's play castles. You know that when you're buying from Lilliput, the details don't come short. Containing several secret areas, rock wall, superb front entrance door. Plus a fireplace mantel. So cool.
- 60 ft² in interior play space
- 8' Wide, 6' Deep, 8' High
- 3 windows
- For ages 3-7
 Victorian Mansion
If you were to take a shrink ray and a time machine back to a residential Victorian neighborhood, you very well may end up with Lilliput's Victorian Manson. The front tower and mansard roof really make the playhouse look like it's right from the 1880s. Plenty of sunlight is allowed to come though with the many windows and front door.
- 48 ft² in interior play space
- 8' Wide, 6' Deep, 8' High
- 7 windows
- For ages 3-7
 Cotton Candy Manor
Modern suburban living shouldn't be left just for the adults, now the kids can get in the action to. The delightfully named Cotton Candy Manor has everything a tasteful kid could want. 2nd level balcony, roof dormers and front door knocker and just some of the wonderful details you'll partake of when you choose this abode. And yes, it does have a working doorbell too!
- 80 ft² in interior play space
- 15' Wide, 6' Deep, 120' High
- 7 windows
- For ages 3-7
Daniels Wood Land
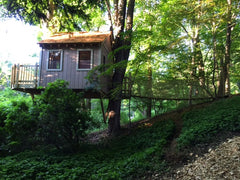
 The Original
As far as I'm concerned, anything the brothers at Daniels Wood Land touch is gold. They've created props for movies, built commercial playgrounds and shoot galleries, have their own show, and it all stared with the Original. Using a real log for the base and topped with a wonderfully whimsical treehouse, you can't get more story book than this awesome clubhouse.
- 20 ft² in interior play space
- 8.5' Wide, 7' Deep, 15' High
- 6 windows
- For ages 3-7
 Monkey Mansion
A much more involved version of the Original, the Monkey Mansion has all kinds of ways for kids to run, jump and swing around to nearly no end. Monkey bars, climbing net, climbing wall, fireman's pole,swing and slide are just some of the ways your child can interact with this crazy creation. You can even opt for a deluxe upgrade and bumps up the size of the clubhouse and log size.
- 20 ft² in interior play space, 280 ft² in total exterior space
- 27' Wide, 10.5' Deep, 15' High
- 6 windows
- For ages 3-7
 Scallywag Sloop
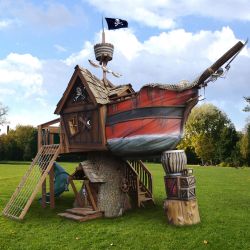
My personal favorite of the DWL treehouse kits, the Scallyway Sloop has been littering the internet with it's envious photos for some time now, and for good reason, this thing is just cool. Practically Disney grade quality, this ship clubhouse kit is the ultimate backyard accessory for the sea minded child. Great attention to detail would be an understatement. If I had to pick my favorite part, it would have to be the skeleton figurehead. Also if you have more kids than you know what to do with, consider opting for the deluxe version!
- 30 ft² in interior play space, 280 ft² in total exterior space
- 19' Wide, 9.5' Deep, 23' High
- Jolly roger, crows nest, main mast, swing and fireman's pole
- For ages 3-8
Little Cottage Company
 Grand Portico Mansion
At first glance, this looks like a typical suburban mansion, until you realize it's for those shorter than 4 feet tall and not so up in th years. Complete with a 2 story look and plenty of windows to spare. Built by the Pennsylvania Amish, this delightful artisan playhouse kit will charm and rapture your little ones for years.
- 160 ft² in interior play space
- 16' Wide, 10' Deep, 8' High
- For ages 3-6
- 2,950 Lbs
 Sara Victorian Mansion
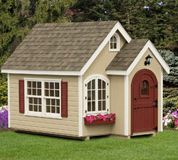
Basically a smaller version of Lilliput's Grand Victorian, the Sara Victorian Mansion has a lot of fun and magic to offer. Lavish details like a hip roof, front torrent with loads of windows and front door overhang really add a lot to the overall whimsical aura. This playhouse kit will make for a great gift to that special little one.
- 160 ft² in interior play space
- 16' Wide, 10' Deep, 10' High
- For ages 3-6
- 2,400 Lbs
Standard Playhouse Kits ($500-$5000)
Little Cottage Company
 The Victorian
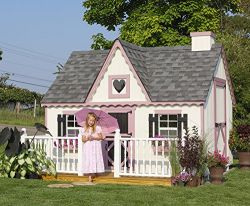
Whenever you buy a playhouse kit from the Little Cottage Company, you know that you're buying into quality. The Victorian features a delightful hip roof design with front porch, chimney and pink wavy trim. The perfect spot to have a lovely tea party with all your closest stuffed animals friends.
- 96 ft² in interior play space
- 8' Wide, 12' Deep, 8' High
- For ages 3-6
- 1, 079 Lbs
 The Gingerbread
I love this one and it offers a lot of interior play space for the buck. Comes in three different sizes and many different colors so you can get what is best for you. Ornate trim, chimney and a heart shaped window add a lot of character too. A fine outdoor kit for that little girl in your life!
- 96 ft² in interior play space
- 8' Wide, 12' Deep, 8' High
- For ages 3-6
- 1, 015 Lbs
Kids Crooked House
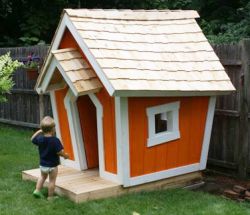 The Origional
All hand crafted in the state of Maine, the folks at Kid's Crooked House know how to capture the wonderment of being a child with their uniquely created structures. The Original allows you to get your foot in the door without spending too much to get there. Really, the only thing straight forward on this playhouse is the value it'll bring to you and your kids.
- 24 ft² in interior play space
- 4' Wide, 6' Deep, 6.5' High
- For ages 3-6
- 3 windows
- Gable Roof
 The Deluxe
The Deluxe is the next tier up from the Original and offers even more space for the kids to play in. Right from the pages of an absorbing children's book, the Deluxe exudes fun all over. Add in more windows and a dormer, you'll find yourself with the best selling crooked house.
- 24 ft² in interior play space
- 4' Wide, 8' Deep, 6.5' High
- For ages 3-6
- 7 windows
- Gable Roof
WoodManor.net
 The Cottage
Having been in business for four decades, the people behind the craftsmanship at Wood Manor know what they're doing. Because of the general more hands on experience and additional building materials needing to be bought separately, all the kits provided by Wood Manor are more for the DIY minded weekend warrior. The Cottage kit features two levels for the kids to interact with in a very realistic country home.
- 80 ft² in interior play space
- 12' Wide, 8' Deep, 12' High
- For ages 3-8
- 9 windows
- Cross & stepped gable roof
 Kid's Castle
This is a fun one and a real treat for whoever has it come their way. With two levels, two front turrets for that fortress look and a 2nd floor balcony complete this engrossing play castle. Keep in mind that a lot of work will be needed to get this thing %100, but that should be half the fun!
- 100 ft² in interior play space
- 14' Wide, 8' Deep, 12' High
- For ages 3-8
- 19 windows
- Gable & hip roof
 Country Gal
If you still like the idea of a more hands on playhouse kit, but the above two seem a bit intimidating, fear not, for the Country Gal is here. Simpler in design, Wood Manor claims you can easily complete this over the weekend. Don't let the easier construction fool you though, this kit still features lots of space for playing and games, plus a front porch and balcony. Cool!
- 96 ft² in interior play space
- 8' Wide, 12' Deep, 12' High
- For ages 3-8
- 8 windows
- Cross gable roof
 Queen Anne
Wow, this thing is epic. If I were still a kid, I would be beside myself for days if I got this mini-mansion. If you're looking for the ultimate DIY playhouse kit, please look no further than the Queen Anne. Parading about 350 square feet, chuck full of cool accessories and enamoring details. Higher walls also allow for older children to comfortably use this playhouse as well. Best of the best.
- 350 ft² in interior play space
- 23' Wide, 13' Deep, 14' High
- For ages 3-10
- 14 windows
- Cross gable & hip roof
Suncast
 Backyard Cottage
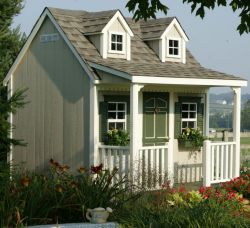
Fine engineering and quality Amish made go into every one of these cute little dwellings. The Backyard Cottage will look great tucked away in any backyard and it's the small things that really make it stand out. Features two dormers and petite front porch make the Backyard so inviting and winsome.
- 72 ft² in interior play space
- 8' Wide, 9' Deep, 8' High
- For ages 3-10
- 4 windows
- Gable roof
 English Manor
Looking for something a little different? This old world style manor is sure to delight. Comes with a arched child sized front door and an adult sized in the back, hinged and gable windows.
- 72 ft² in interior play space
- 8' Wide, 12' Deep, 8' High
- For ages 3-10
- 4 windows
- Stepped gable roof
Axi
 Alice
Alice
Crooked houses seem to be all the rage these days. Being a younger child is certainly a magical time, and playhouses like the Alice can greatly aid in feeding that active imagination. Specially imported Asian cedar wood, Cunninghemia lanceolata, is used to construct all the structure kits for Axi. With five windows and 10 square feet of interior space, your child will feel a cozy sense of home with the Alice.
- 10 ft² in interior play space
- 3' 1" Wide, 3' 5" Deep, 4' 8" High
- 5 windows
- For ages 3-6
 Lisa
Lisa
The next size up from the Alice, the Lisa sports the same crooked design, but with a total of 20 square feet of play space. The 3-6 rage is still the sweet spot for the idea child's age. You also get a front porch too!
- 20 ft² in interior play space
- 5' 9" Wide, 5' 9" Deep, 5' 7" High
- 7 windows
- For ages 3-6
Outdoor Living Today
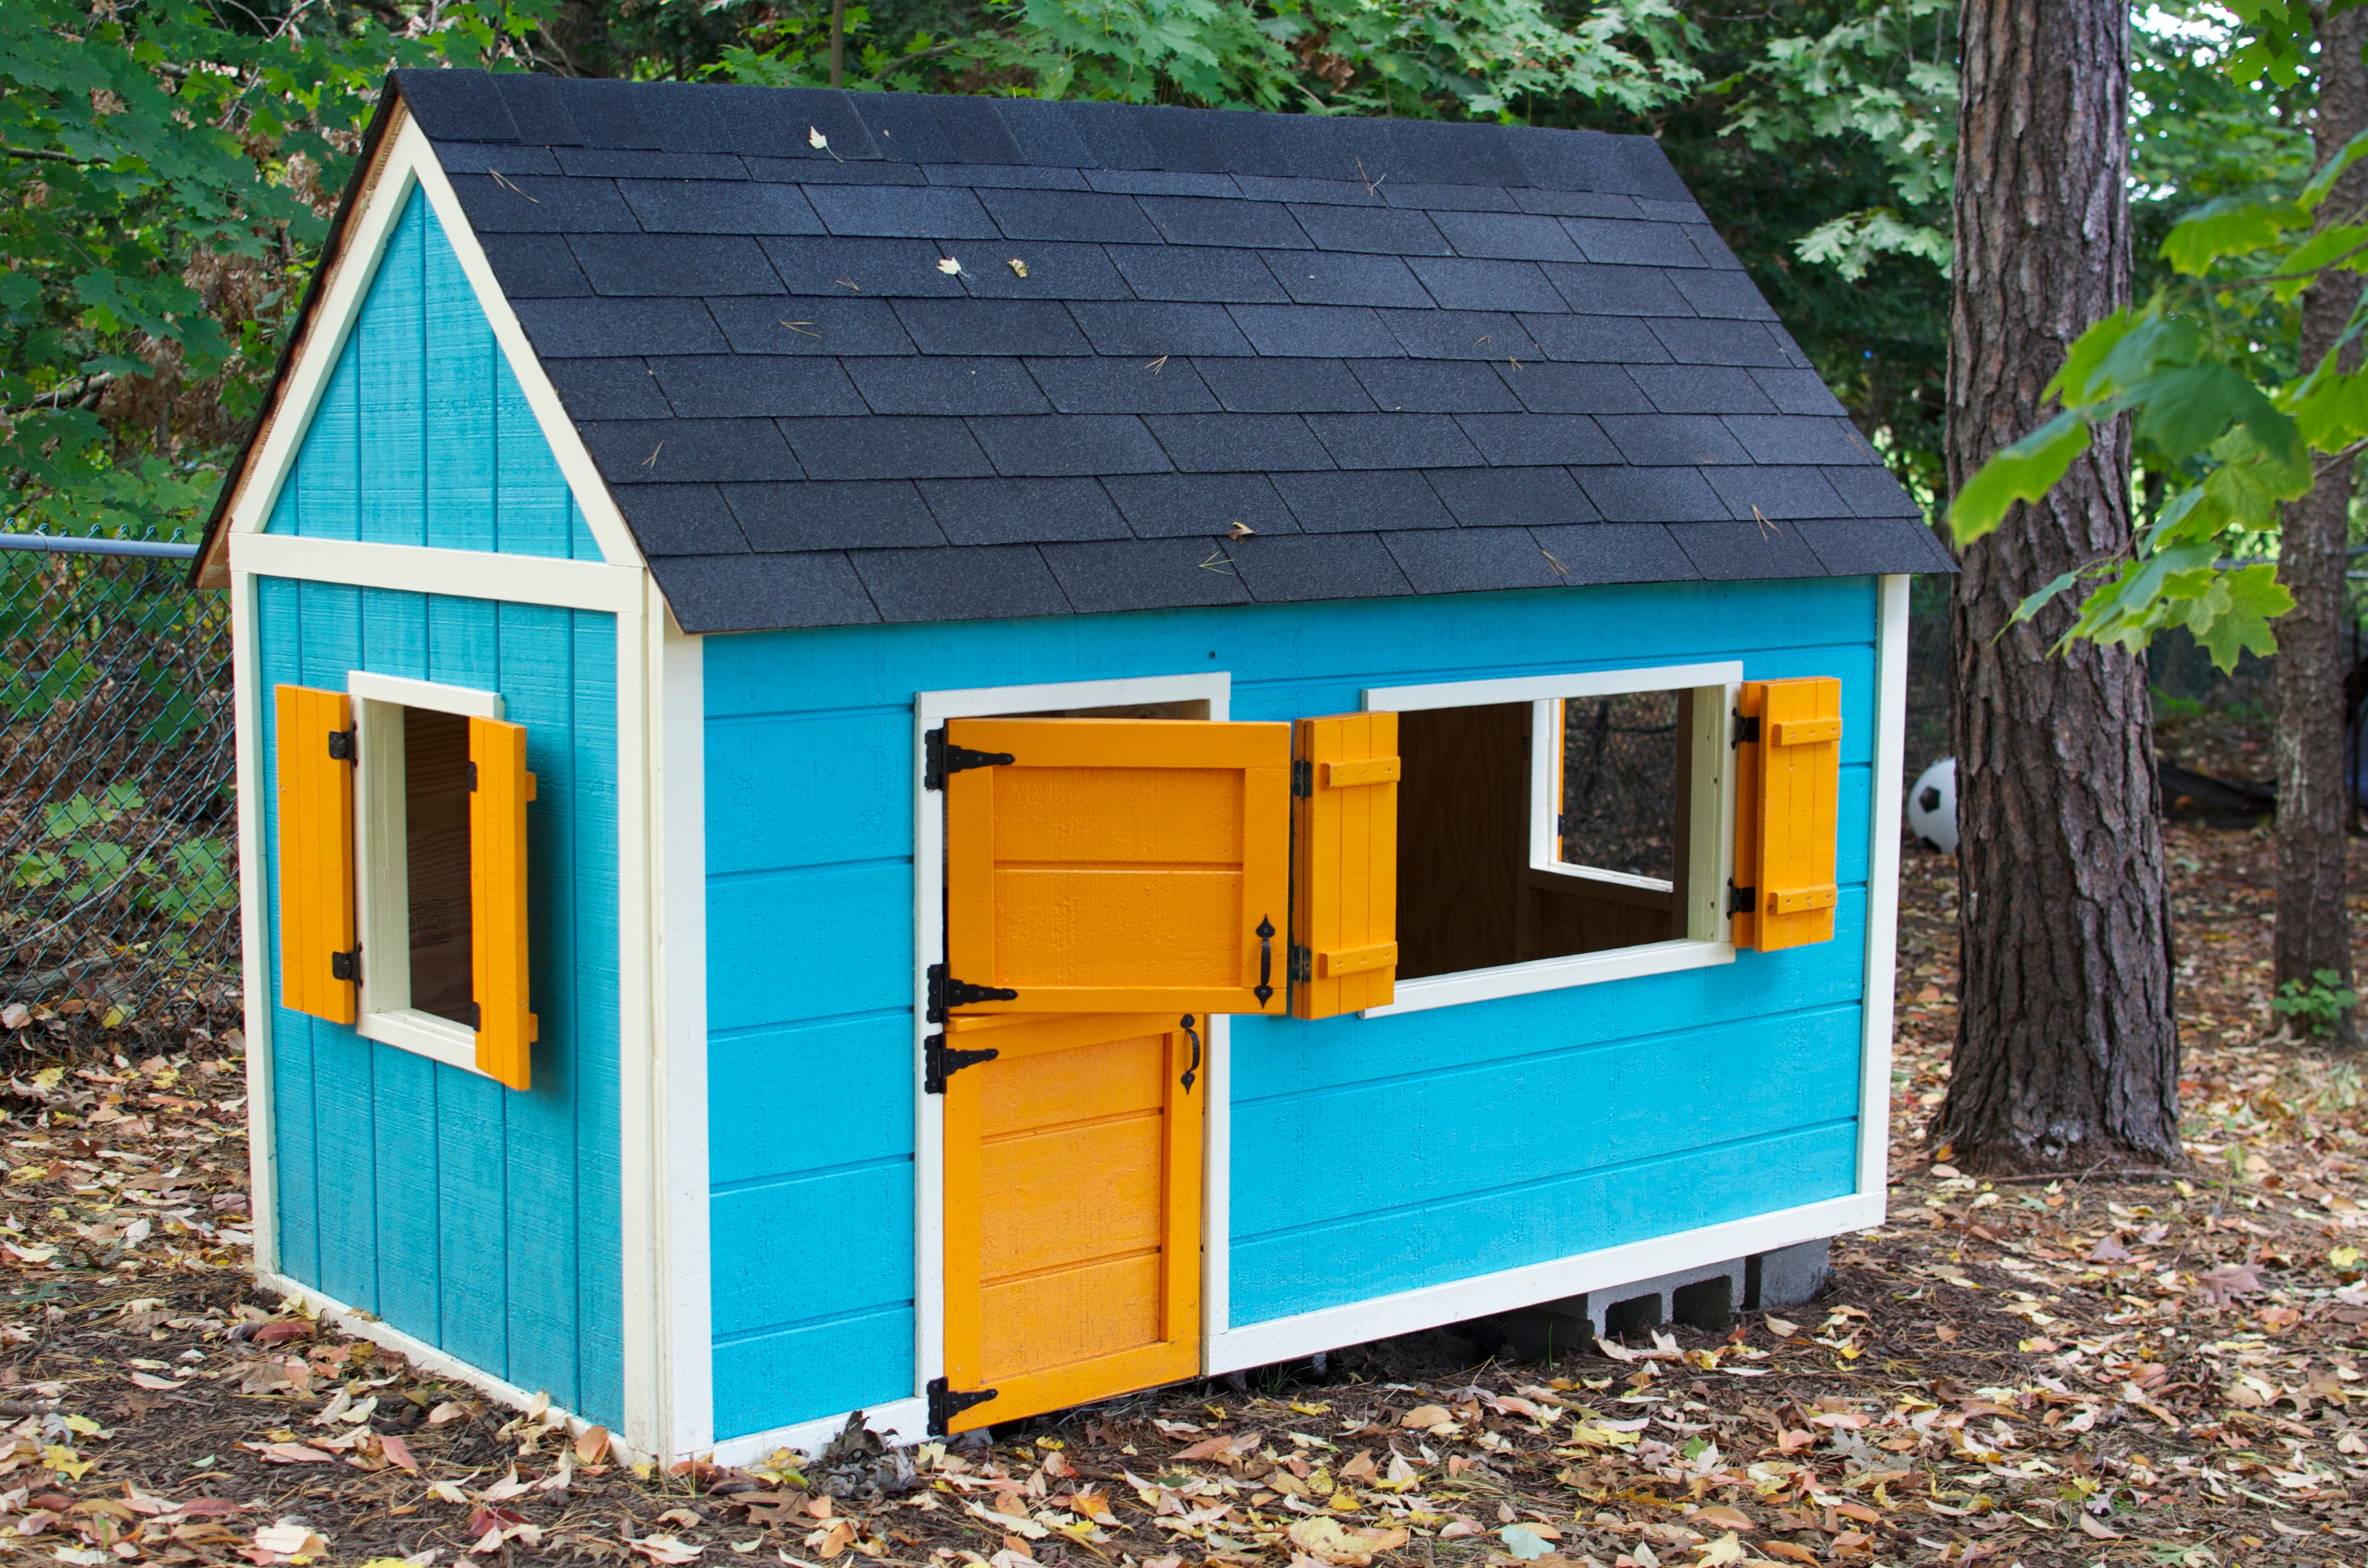
 Laurens Cottage Playhouse
I like this one a lot! It's all red cedar construction does an amazing job of adding so much character and warmth. The fetching front Dutch door, shuttered gable windows and two level design make for quite an engrossing clubhouse kit. Rustic in design and easy to assemble. This one is a real looker.
- 100 ft² in interior play space
- 9' Wide, 9' Deep, 8' High
- For ages 3-8
 Little Cedar 6 x 6 Playhouse
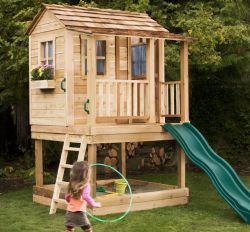
If you're looking for a mix between a playhouse and a playset, this one is the ticket. Elevated about 4' in the air, allowing for a sand box underneath and a front slide. Add in the premium all cedar construction and you have yourself the perfect outdoor getaway.
- 36 ft² in interior play space
- 6' Wide, 6' Deep, 9' High
- For ages 3-8
 The Sunflower
Another great kit option for those looking for high quality. The Sunflower has all cedar construction including cedar roof shakes. Three opening windows and a front porch with a roof overhang allow more ways to interact and play with this kit. Just looking at it makes me want to go pick out a nice cherry red stain and go to town.
- 54 ft² in interior play space
- 6' Wide, 9' Deep, 6' High
- For ages 3-8
Backyard Discovery
 Scenic Heights Playhouse
Compact in design but still a blast, the Scenic Heights packs a whallop in a small working footprint. Lots of ways for the kiddies to go up and down, there's also room to put a sandbox underneath.
- 54 ft² in interior play space
- 6' 4" Wide, 6' 4" Deep, 7' High
- For ages 3-6
- Gable roof
 Windsor Castle
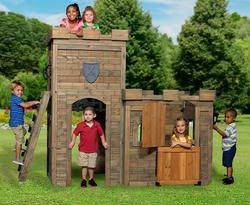
Castles are a ton of fun and do a supreme job of helping the imagination take you to far off places. The facade mimics real stone walls and battlements and the rock wall to the 2nd level tower is the icing on the cake. Bound to be popular where ever kids are.
- 40 ft² in interior play space
- 8' 4" Wide, 4' Deep, 6' High
- For ages 3-6
Lancaster Country Barns
 Boy's Playhouse
By now you've seen a few companies based out of Lancaster Amish country, and for good reason. The quality these humble people produce is top notch. That is no different for Lancaster County Barns. The "Boy's" playhouse offers a classic gable design with a loft over the front porch. Add in some windows, paint and Voilà, a comfortable kid dwelling is born!
- 40 ft² in interior play space
- 8' Wide, 10' Deep, 7' High
- For ages 3-7
 Victorian Dollhouse
This one is so cute and if you have a little girl, I don't see how they could feel differently. The perfect size for when they're just starting to feel independent, the applicably named Victorian Dollhouse can't help but catch a 2nd look.
- 24 ft² in interior play space
- 6' Wide, 4' Deep, 6' High
- For ages 3-6
Oregon Timber Werks
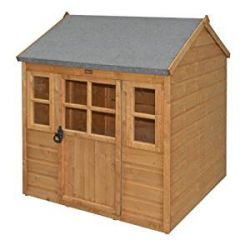
 The Classic
If you're more of a mountain man type or just going for a more rustic look, the Classic Cottage defiantly qualifies for a fine election. Beautiful, oiled lap siding and mock rough saw lumber construction makes this kit right at home in any heavily wood area. Also comes with working window shutters and Dutch door!
- 24 ft² in interior play space
- 6' Wide, 6' Deep, 7' High
- 3 windows
- For ages 3-8
- Gable roof
EZ - Fit Sheds
 A-Frame 6' x 8'
For a great complete package, you can't go wrong with EZ-fit Sheds. The A-Frame comes with outstanding construction and everything you'll need to build the ultimate child's dream escape. Plus it has a lock and key to keep rouge neighbors out.
- 32 ft² in interior play space
- 6' Wide, 8' Deep, 7' High
- 2 windows
- For ages 3-8
- Gable roof
Other Great Standard Kits
Playhouse Kits
Little Alexandra Cottage
Little Cedar Cottage
Hobbit Hole Store
Big Merry Hobbit Hole
Dutch Crafters
Tree house Loft Backyard Play Set
Imagine that playhouses
The Sweetheart
Economical Playhouse Kits (Under $500)
Waltons
 Honeypot Snug
For a real whimsical playhouse experience for a great value, check out the designs at Waltons. This UK based company offers all kinds of colorful and magical clubhouses. The Honeypot Snug presents itself as a cozy little wonderment all under one small roof. Did I mention it's a great deal?
- 12 ft² in interior play space
- 4' Wide, 4' Deep, 5' High
- For ages 3-6
- Gable roof
 Honeypot Poppy Tower
For a simply delightful provincial backyard retreat, the Poppy Tower is a delight. Elevated to allow for a slide, this rustic wooden kid habitat comes with shatterproof windows, double framed corners and untreated cedar lumber so you can add your won creativity to it's walls.
- 12 ft² in interior play space
- 5' Wide, 5' Deep, 7' High
- For ages 3-7
- Gable roof
Lancaster Country Barns
 Toy Cabin - Starter Kit
When they way starter Kit, they aren't kidding. This little cabin is literally put together like a Lincoln log set. Build it from scratch without need to do any cutting and tear it all back down because you can. You and your child will love assembling and disassembling this thing together!
- 12 ft² in interior play space
- 3' Wide, 4' Deep, 3' 4" High
- For ages 3-5 1/2
- Gable roof
Bosmere
 Little Lodge
A nicely formulated clubhouse for one or two little guys. Produced by an English company from 1926, the splendid all wood framework and reasonable price make this a classy choice indeed.
- 20 ft² in interior play space
- 5' Wide, 4' Deep, 4' High
- For ages 3-6
- Gable roof
E-Z Frames
 6x6 Kit
For something a bit different, try the EZ frame playhouse kit. For a very reasonable price, this kit only includes the framing of a 6x6 structure, and you add the rest, whether it be plywood or bed sheets. Great for indoor child's clubhouses.
Other Great Standard Kits
Backyard Discovery
Timberlake
Scenic
Gramercy Home
Brown Modern
Outward Play
Badger Cubby
KidKraft
Outdoor Playhouse
Big Backyard
Bayberry
]]>


 Step 7: Rafters From (1) 2x4x8, cut and assemble the two piece unit depicted in the below illustration. Three of these units will be required. Install these three units to the top of the walls as depicted in the 2nd below illustration.


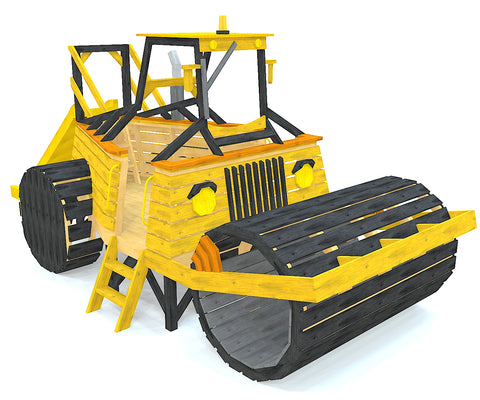
 Similar to the monster truck, this design was inspired by the huge, ultra class haul trucks used by mining operators to carry up to 400 tons of ore in one go. Many of them had several ladders bolted right to the front grill, and tires that stood 13 feet tall. Needless to say, these are pretty serious construction vehicles, and it now can be right in your backyard!


 If you ever worked at a grocery store, hardware store, warehouse or countless of other locations, you're bound to come across the standard wooden pallet quite often. You would also know that left to their own devices, they can add up and overstay their welcome. The fact that you're here suggests you've asked yourself, “can I turn these pallets into a wicked cool playhouse”? Yes, yes you sure can!


 3.
3.  4.
4. 

 7.
7.  8.
8. 10.
10.  11.
11.  12.
12.  13.
13.  14.
14.  15.
15.  16.
16.  17.
17. 
 For those without much experience in construction and carpentry, or just need a refresher, sometimes the basics need to be made concise and clear. If you've already considered your
 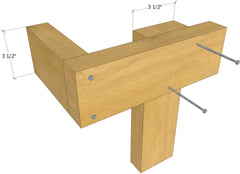 When building your playhouse, use 3” decking screws or 16d nails to secure all 2x material when building walls, joists, rafters and ladders. Use 2” decking screws or 12d ring shank nails for securing all 5/4” x 6” material. For posts, use ½” galvanized carriage bolts with a washer and lock washer.
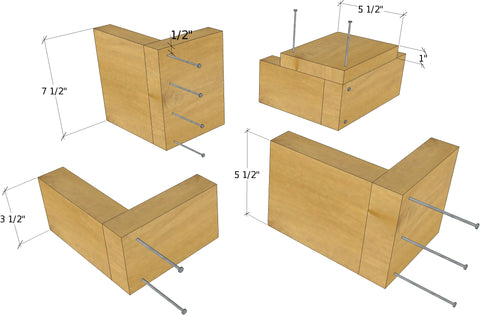
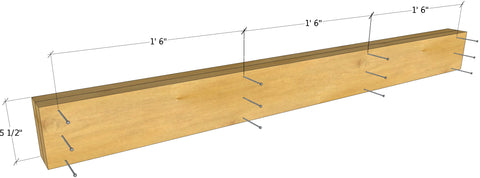 When two or more joists are directly next to each other, they need to be attached to each other every some may inches. Most codes required that they be screwed or nailed every 18", from both sides, with the correct corresponding number of fasteners to the 2x size. For a playhouse, securing the joists every 18" from one side, with just a top and bottom fastener is plenty.
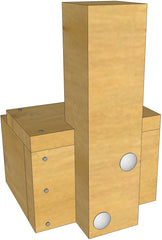
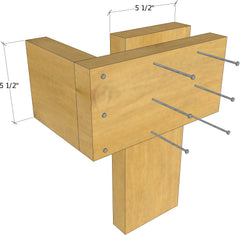
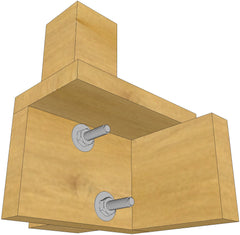 All 4x4 post should receive two ½” carriage bolts, top and bottom and opposite each other. Unlike the screws and nails used in the above examples, two ½” holes will need to be pre-drilled before the bolts can be installed. 5 ½” long bolts can be used with most of the posts in the hosted playhouse plans. All bolts will need a washer, lock washer and nut.
  Headers are usually made of 2x4s or 2x6s and 1/2" plywood. For 2x4 headers, two 3" screws on the ends and two every 16". Use three 3" screws for 2x6 headers, four for 2x8, etc.
 There may be a few circumstances where "toe nailing" will be required. This could be for securing joists to a foundation, rafters to a lower plate, or connecting angled pieces together.
 Now that two of the thimbles have been attached, install all four eye bolts to the posts by drilling two holes, a few inches away from the bottom and top, in each. Slide in the eye bolts and install the washer and nuts. Both of the turn buckles should be about 90% extended and attached to two of the eye bolts. The other two thimbles should now be attached to the ends of the turn buckles.
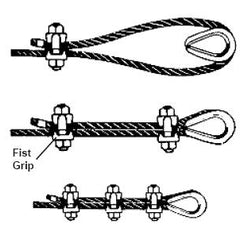 Now it's time to actually install the cable. Measure the distance between the end of the turn buckle and the eye bolt the cable would connect to. Add 10 inches to this measurement and cut that length. The cable will be held in place around the thimbles with three fist grips on each end. See the illustration on how to properly install these three fist grips. The cable should be slightly loose though this process so that it can actually be worked with. When both sides have been firmly secured, tighten up the turn buckle. You should now notice a significant improvement in your deck's stability.


 It's great being a kid. Summers off, free time galore, no worries and no responsibilities. Plus recess. Ah yes, that long awaited break from the boredom and tedium that was school. The swings, slides, sand box and jungle gym were the beacon of light in an otherwise boilerplate weekday. In fact, it's been proven that kids learn better if they're allowed to run around and play in intervals throughout the school day.


 Ahoy, me Hearties! Watch out, it's time ter get started on a piratey project, me ship!


 It was a time when Spyrius and Ice Planet 2002 ruled the day, with a few Space Police II and Unitron groupies thrown in for good measure. I was pretty well off with the Spyrius Robo-Guardian, Recon Robot, Spyrius Lunar Launch Site and, thanks to my uncle, the friggin Ice Station Odyssey. Of course that was nothing to what my best friend had, the Unitron Monorail Transport Base, model 6991. With a base price of $178, 573 flashy pieces and complete with the Spyrius Droid and a reconnaissance vehicle that the train can slide into and drive away in, it was every boy's dream!
  I went to a prep school who's business was to get us all into some kind of college or university. Expressing my idea to go to a carpentry trade school was understandably not much of a hit for my career counselor, especially since the school had a 97% college entry record. Still I got into a 2 year program, one year being rough carpentry, such as framing walls, and the 2nd year in finish carpentry, such as drywall, stairs and cabinetry. For a little while I had the ambition to build my own house, inspired by a 3500 square foot beauty I used to regularly drive by. That went away after I realized that the time spent building the house is time without a paycheck.
 I now have over 5 years of tree house experience, and it's been a blast. In many ways, you're able to live vicariously through the excited kids who get to have something really cool you never got to own. There is so much creativity and imagination in building tree houses. No two trees are alike; every one of them is different, every yard as well. I'm sure that if you take a look at my

 This is an obvious one. Kid's crave stuff to play with, both big and small. A pirate ship without a ship wheel, jolly roger flag and treasure map just seems so... bare. Avoid banality and spice things up that'll wet your child's appetite and get them going outside. It doesn't have to be much, although it could be.

 Is your child too big for the size playhouse you can afford? Don't bother. Instead invest in a zip line, hammock or something else appropriate for their age. The bigger the child, the more complex and sizable the playhouse should be. Consider also the size of your yard. If there is no room for something bigger than a 6'x6' play fort, it may be wise to spend your money on something else that'll be more engaging. Look into our list of