
How to Attach Rough Framing Together with Screws and Nails
 For those without much experience in construction and carpentry, or just need a refresher, sometimes the basics need to be made concise and clear. If you've already considered your foundation type and picked out what materials you'll be using to build your playhouse, it's now time to review how these components should be fitted together.
This framing outline has been designed to help guide you through the process of how to nail and screw lumber together. The methods for attaching lumber described below do follow most residential construction codes, though it's recommend you check with your local requirements.
Note that all the playhouse plans include a lumber list. Using this list and the fastener instructions below, the near exact hardware count and price for every plan can be extrapolated.
Recommended Types of Nails, Screws and Bolts
 When building your playhouse, use 3” decking screws or 16d nails to secure all 2x material when building walls, joists, rafters and ladders. Use 2” decking screws or 12d ring shank nails for securing all 5/4” x 6” material. For posts, use ½” galvanized carriage bolts with a washer and lock washer.
Screws generally have more holding power compared to an equally sized nail and are much faster to remove if a mistake is made. Because of this, screws are recommend over nails for your playhouse project
.
Framing Walls, Joists, Rafters & Ladders
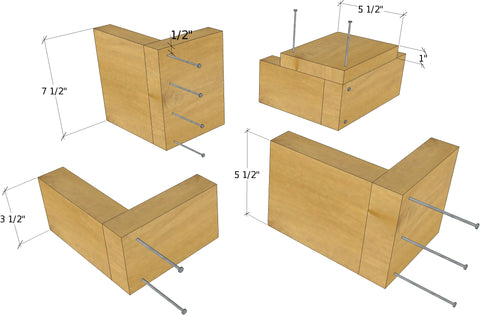
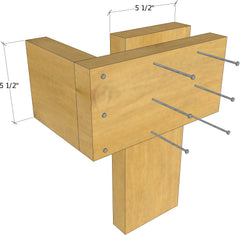
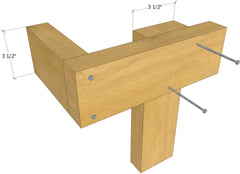
When it comes to fastening framing together in the form of walls, joists and other scenarios, where the ends of 2x lumber is prone to cupping or twisting, the first and last fasteners are the most important as they are doing most of the work keeping those pieces in place to prevent warping. In all cases, keep the nails or screws centered (¾” from the edges), and keep first and last fastener a ½” from the top and bottom of the lumber. In the cast of a 2x4, there will only be a top and bottom fastener, but in the case of a 2x6 or something larger, there will be some in the center. Basically for every step up from a 2x4, another fastener will be used.
Scab & Sister Joists
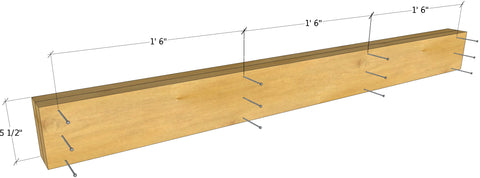 When two or more joists are directly next to each other, they need to be attached to each other every some may inches. Most codes required that they be screwed or nailed every 18", from both sides, with the correct corresponding number of fasteners to the 2x size. For a playhouse, securing the joists every 18" from one side, with just a top and bottom fastener is plenty.
Decking
Decking boards only come in one width and height: 5 ½” x 1”. Every joist that a decking board travels over should be secured to. However, unlike a 2x6, only two fasteners, top and bottom, will be needed.Posts
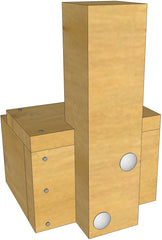
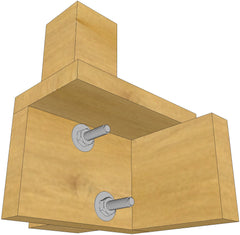 All 4x4 post should receive two ½” carriage bolts, top and bottom and opposite each other. Unlike the screws and nails used in the above examples, two ½” holes will need to be pre-drilled before the bolts can be installed. 5 ½” long bolts can be used with most of the posts in the hosted playhouse plans. All bolts will need a washer, lock washer and nut.
 Headers & Window Units
 Headers are usually made of 2x4s or 2x6s and 1/2" plywood. For 2x4 headers, two 3" screws on the ends and two every 16". Use three 3" screws for 2x6 headers, four for 2x8, etc.
Like laying out walls and joists, use two 3" screws for each 2x4 intersection. If two or more studs are parallel to each other, screw them together every 24".
Toe Nailing/Screwing
 There may be a few circumstances where "toe nailing" will be required. This could be for securing joists to a foundation, rafters to a lower plate, or connecting angled pieces together.
Depending on how the two pieces are angled you wish to fasten, start by tapping in the nail at a 90 degree angle. After the nail has started to grab, bend it to the direction it needs to follow, and continue hammering or screwing until it is fully inserted. This is most often found on your more whimsical or "crooked" designs that are less conventional in layout.
Plywood
When installing plywood to your playhouse, use a 2" or 2 1/2" screw every six inches along the exterior and any interior perimeter of each piece. When screwing in the "field" or across the rest of the piece, screw down every 12" to any available stud, joist or rafter behind.
Monkey Bars
To install monkey bars to your playset, we recommend using 1½" wooden dowels fitted between two beams of lumber. You'll need a 1½" drill bit, hammer, construction adhesive and R4 screws to drill out and install the dowels in place.
Larger Screws
You may encounter a few spots in your project where a larger RSS type screw may come in handy, especially if some of the lumber is warping or bending from drying out. These types of screws can be used to suck uncooperative pieces back together.
Other Resources
If you found this page to be helpful in how to construct your playhouse project, be sure to also check out how to make larger than 45 degree cuts, how to add a swing set to your playhouse and how to reduce unwanted movement in your playhouse platform.